8x8 LED 点阵模块
之前我们已经点亮过数码管了,今天我们来学习 8x8 点阵 LED 屏,先通过点阵屏显示一个图案,最终实现使用 PS2 摇杆控制点阵屏制作一个 LED 移动的小游戏。

实验原理
LED 8*8 点阵屏模块是一种常见的 LED 屏幕模块,它由 8 行 8 列的 LED 点阵组成。每个 LED 点可以控制亮灭,通过对每个点的亮灭状态的控制,可以在屏幕上显示出各种图案和文字等信息。
这个 8x8 点阵的原理,其实与数码管是一样的。看看下面的原理图就知道了。
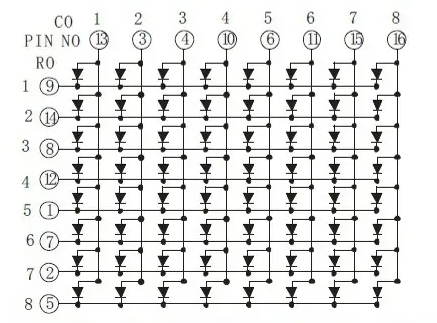
从图中可以看出,LED 点阵屏由 64 个发光二极管组成,且每个发光二极管是放置在行线和列线的交叉点上,当对应的某一列置 1 电平,某一行置 0 电平,则相应的二极管就亮,我们这款点阵屏是共阴型的,共阳型则相反,给列置 0 电平,给行置 1 电平。
直接使用 I/O 口驱动,占用较多的 I/O 口资源,特别是随着点阵屏的数量增加,所以一般的应用,会选择专用的驱动芯片,例如 74HC595,MAX7219 等等。
硬件电路设计
物料清单(BOM 表):
| 材料名称 | 数量 |
|---|---|
| PS2 摇杆模块 | 1 |
| 8*8 LED 点阵屏 | 1 |
| 杜邦线(跳线) | 若干 |
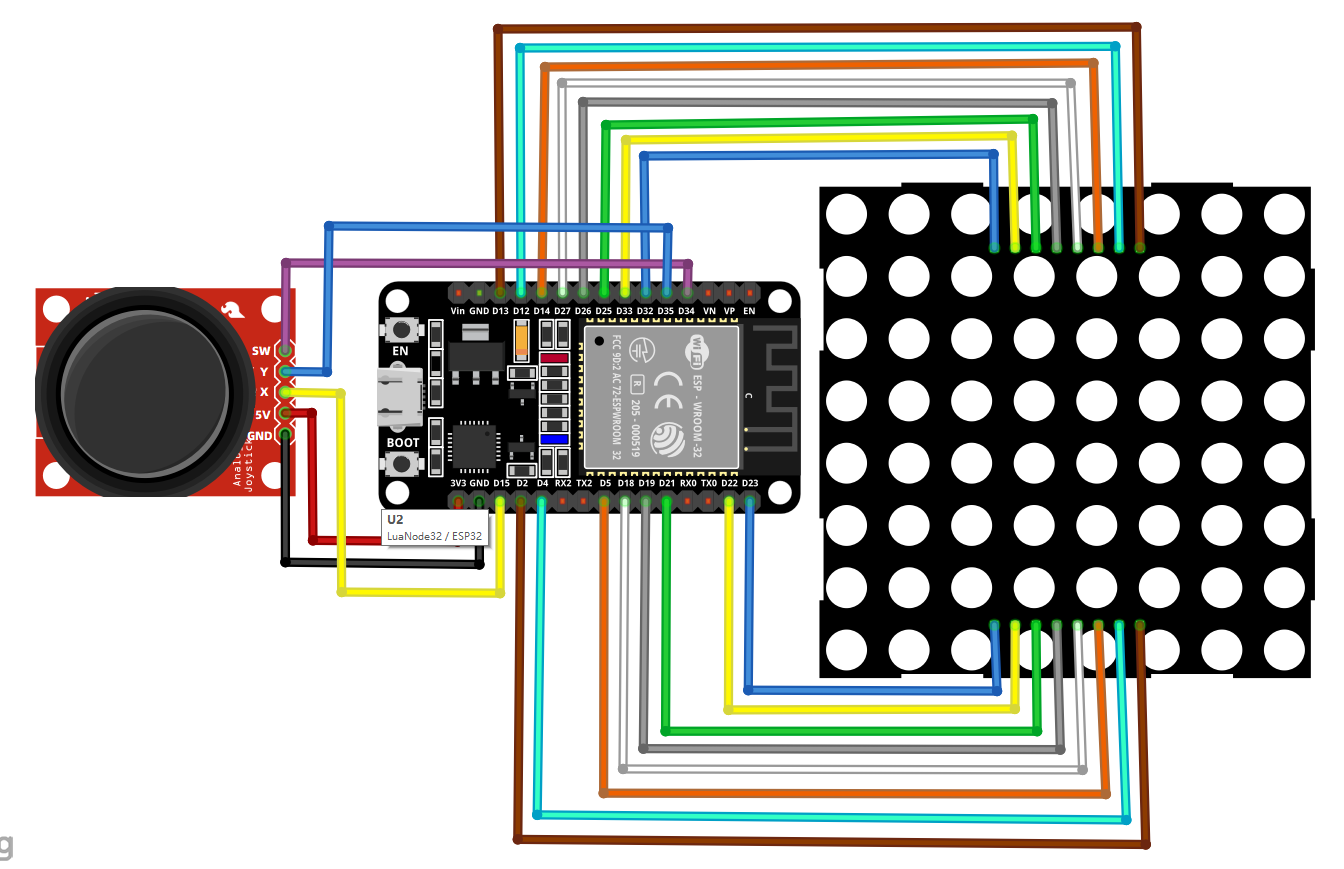
PS2 模块的 +5V 引脚接 ESP32 的 3V3 引脚,GND 接 GND,SW 接 D34,X 接 D15,Y 接 D35。
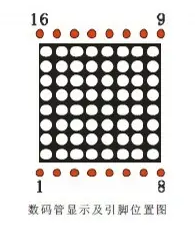
LED 点阵屏的 1-8 分别接 D23、D22、D21、D19、D18、D5、D4、D2;9 - 16 分别接 D13、D12、D14、D27、D26、D25、D33、D32。
软件程序设计
1. 循环遍历所有 LED
我们第一个程序就先写检测一下是否所有的 LED 都可以正常工作,代码如下:
import time
from machine import Pin


# 定义行引脚
row_1 = Pin(13, Pin.OUT)
row_2 = Pin(25, Pin.OUT)
row_3 = Pin(2, Pin.OUT)
row_4 = Pin(27, Pin.OUT)
row_5 = Pin(23, Pin.OUT)
row_6 = Pin(4, Pin.OUT)
row_7 = Pin(22, Pin.OUT)
row_8 = Pin(18, Pin.OUT)

# 定义行对象列表
row_list = [row_1, row_2, row_3, row_4, row_5, row_6, row_7, row_8]

# 定义列引脚对象
col_1 = Pin(26, Pin.OUT)
col_2 = Pin(21, Pin.OUT)
col_3 = Pin(19, Pin.OUT)
col_4 = Pin(12, Pin.OUT)
col_5 = Pin(5, Pin.OUT)
col_6 = Pin(14, Pin.OUT)
col_7 = Pin(33, Pin.OUT)
col_8 = Pin(32, Pin.OUT)

# 定义列对象列表
col_list = [col_1, col_2, col_3, col_4, col_5, col_6, col_7, col_8]


# 初始化所有行为高电平
for row in row_list:
    row.on()

# 初始化所有列为低电平
for col in col_list:
    col.off()

while True:
    # 循环遍历所有位置,先遍历行,再遍历列
    for row in row_list:
        row.off()
        for col in col_list:
            col.on()
            time.sleep_ms(100)
            col.off()
        row.on()
2. 在点阵屏上显示图案
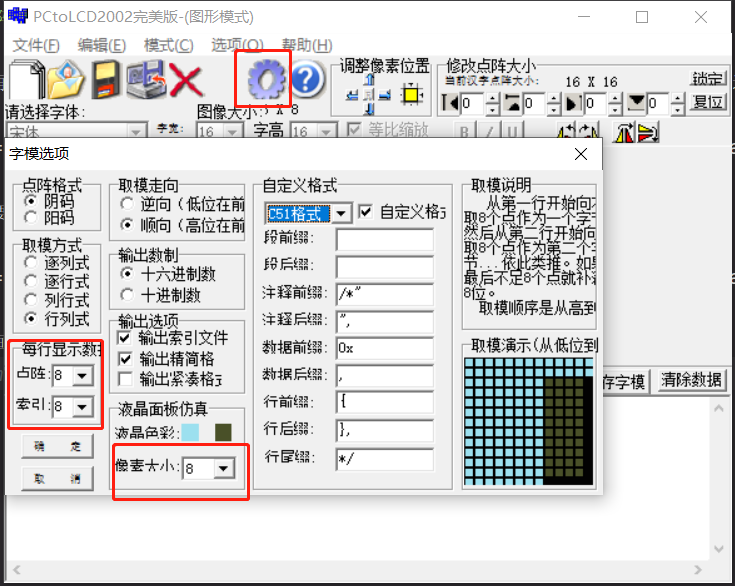
这里我们需要再次用到取模软件,与之前不同的是,这里我们需要新建图像并且,设置图像的宽和高为 8,这样就能保证与我们的点阵屏对应。
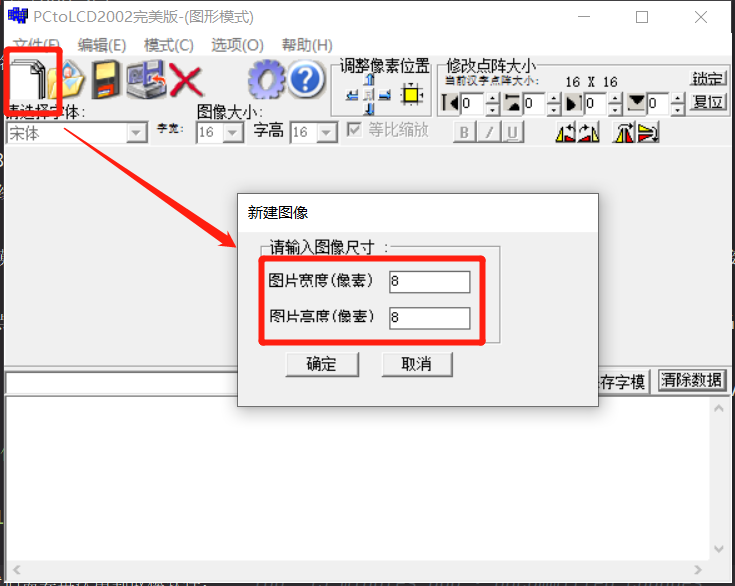
字模设置也需要改一下,
接着在屏幕上画出我们想要显示的图案,比如一个爱心,然后生成字模。
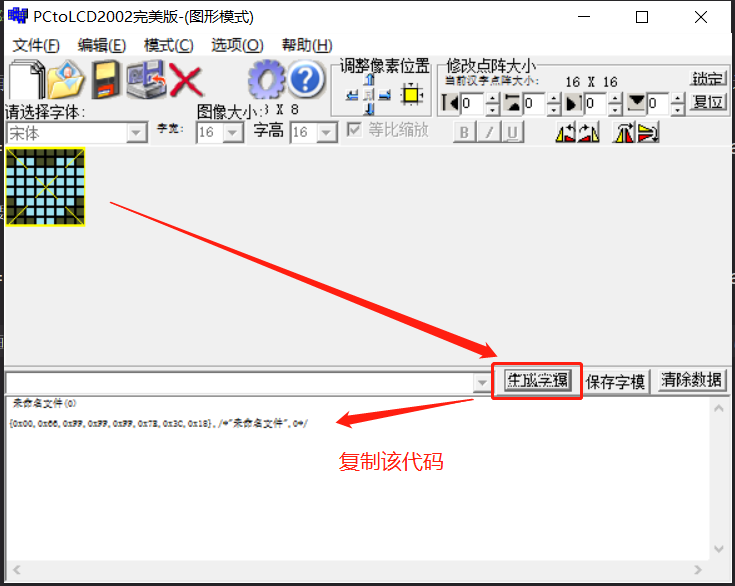
这里,我们获取了一个 8 个 16 进制数的列表,每个 16 进制数转换成二进制就是 LED 点阵屏每行所有 LED 的逻辑,
{0x00,0x66,0xFF,0xFF,0xFF,0x7E,0x3C,0x18}
因此,我们的代码可以这么写:
import time
from machine import Pin


# 定义行引脚对象
row_1 = Pin(13, Pin.OUT)
row_2 = Pin(25, Pin.OUT)
row_3 = Pin(2, Pin.OUT)
row_4 = Pin(27, Pin.OUT)
row_5 = Pin(23, Pin.OUT)
row_6 = Pin(4, Pin.OUT)
row_7 = Pin(22, Pin.OUT)
row_8 = Pin(18, Pin.OUT)

# 定义行对象列表
row_list = [row_1, row_2, row_3, row_4, row_5, row_6, row_7
            , row_8]

# 定义列引脚对象
col_1 = Pin(26, Pin.OUT)
col_2 = Pin(21, Pin.OUT)
col_3 = Pin(19, Pin.OUT)
col_4 = Pin(12, Pin.OUT)
col_5 = Pin(5, Pin.OUT)
col_6 = Pin(14, Pin.OUT)
col_7 = Pin(33, Pin.OUT)
col_8 = Pin(32, Pin.OUT)

# 定义列对象列表
col_list = [col_1, col_2, col_3, col_4, col_5, col_6, col_7
            , col_8]


# 初始化所有行为高电平
for row in row_list:
    row.on()

# 初始化所有列为低电平
for col in col_list:
    col.off()


# 定义图案的逻辑列表
hex_list = [0x00,0x66,0xFF,0xFF,0xFF,0x7E,0x3C,0x18]

# 定义逻辑值列表
logic_list = []

# 格式化逻辑列表
for hex in hex_list:
    logic = bin(hex).replace('0b', '')

    # 补 0
    while len(logic) < 8:
        logic = '0' + logic
    logic_list.append(logic)

# 显示图像
while True:
    for i in range(8):
        for j in range(8):
            col_list[j].value(int(logic_list[i][j]))

        row_list[i].value(0)
        time.sleep_ms(1)
        row_list[i].value(1)
3. 使用 PS2 摇杆控制 LED 移动
最后,我们就可以写摇杆控制 LED移动的代码了:
import time
from machine import Pin, ADC


# 定义摇杆引脚
ps2_x = ADC(Pin(15), atten=ADC.ATTN_11DB)
ps2_y = ADC(Pin(35), atten=ADC.ATTN_11DB)
ps2_button = Pin(34, Pin.IN)

# 定义行引脚
row_1 = Pin(13, Pin.OUT)
row_2 = Pin(25, Pin.OUT)
row_3 = Pin(2, Pin.OUT)
row_4 = Pin(27, Pin.OUT)
row_5 = Pin(23, Pin.OUT)
row_6 = Pin(4, Pin.OUT)
row_7 = Pin(22, Pin.OUT)
row_8 = Pin(18, Pin.OUT)

# 定义行对象列表
row_list = [row_1, row_2, row_3, row_4, row_5, row_6, row_7, row_8]

# 定义列引脚对象
col_1 = Pin(26, Pin.OUT)
col_2 = Pin(21, Pin.OUT)
col_3 = Pin(19, Pin.OUT)
col_4 = Pin(12, Pin.OUT)
col_5 = Pin(5, Pin.OUT)
col_6 = Pin(14, Pin.OUT)
col_7 = Pin(33, Pin.OUT)
col_8 = Pin(32, Pin.OUT)

# 定义列对象列表
col_list = [col_1, col_2, col_3, col_4, col_5, col_6, col_7, col_8]


# 初始化所有行为高电平
for row in row_list:
    row.on()

# 初始化所有列为低电平
for col in col_list:
    col.off()

# 初始化一个 LED 的位置
led_pos = [1, 1]


while True:
    x_value = ps2_x.read()
    y_value = ps2_y.read()

    # 清除 LED 状态
    row_list[led_pos[0]].value(1)
    col_list[led_pos[1]].value(0)

    # 检测 x 轴是否移动
    if x_value > 4095 / 2 + 300  and led_pos[0] > 0:
        led_pos[0] -= 1
    elif x_value < 4095 / 2 - 300 and led_pos[0] < 7:
        led_pos[0] += 1

    # 检测 y 轴是否移动
    if y_value > 4095 / 2 + 300 and led_pos[1] < 7:
        led_pos[1] += 1
    elif y_value < 4095 / 2 - 300 and led_pos[1] > 0:
        led_pos[1] -= 1

    # 显示 LED
    row_list[led_pos[0]].value(0)
    col_list[led_pos[1]].value(1)

    time.sleep_ms(50)