IIC 驱动 LCD1602 液晶屏幕
上一课介绍了如何使用四位数码管模块来显示数字,本课将进一步介绍如何使用基于 IIC 接口驱动的 LCD1602 液晶屏。
在前面章节,我们已经学习过两种显示装置,数码管和 4 位数码管。使用它们可以直观显示一些字符数据,但是它们也有各种局限性,比如显示字符数据太少,硬件设计复杂、代码编写难度大等。这一章就来介绍一种非常简单且常用的显示装置--LCD1602 液晶显示器,使用它可以显示更多的字符数字。
实验原理
1. LCD1602 液晶屏
LCD1602 是很多单片机爱好者较早接触的字符型液晶显示器,所以,在这里花点时间是值得的。
1602 液晶屏的称呼来自于其显示的内容容量,其中的 16 代表每行的字符(数字或英文字符)数,02 代表屏幕一共两行,实际开发中根据需要显示信息的内容多少不但可以选用 1602 屏,还可以选用诸如 2004 屏等。如下图:
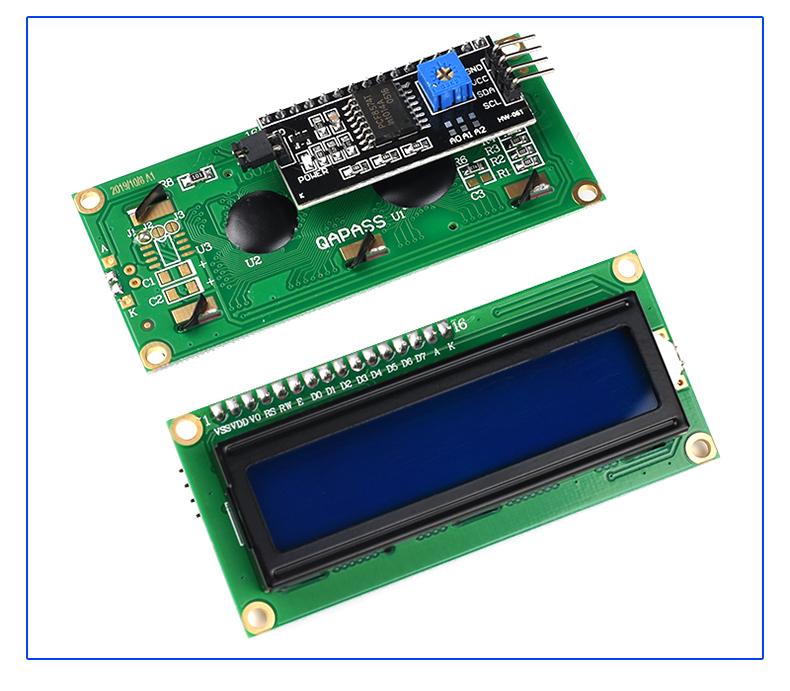
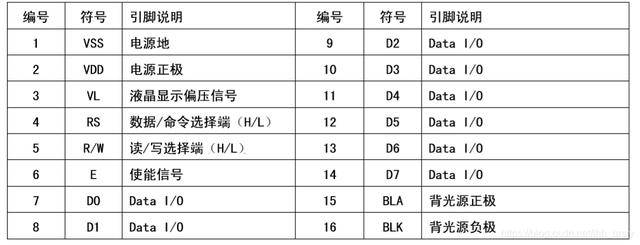
1602 液晶显示屏除了电源、地以外,有 3 个控制引脚 RS R/W E 和 8 个数据引脚 DB0-7。
2. 认识 IIC(I2C)接口
由于 1602 的管脚数过多,如果直接与 ESP32 开发板连接需要占用大量的 GPIO 管脚,不但容易造成资源浪费,连接也非常不方便。
因此实际使用时往往会给 1602 屏增加一块 IIC 驱动版,将 1602 的 16 个管脚连接到由 PCF8574T 作为主要芯片的驱动版上,将接口转换为 IIC 再连接开发板,具体情况如上图所示。
IIC 是一种硬件设备间常用的接口通讯协议,全称是 Inter-Integrated Circuit,也可以写为 I2C。他的设计时的理念是:信号线尽量少并且速率要尽量高。 信号线少,可以减少引脚占用,这对早期的芯片(引脚很少)的很重要。
使用 IIC 接口时一共需要连接四根线,包括:VCC、GND、SDA、SCL,其中 SDA 和 SCL 需要占用 GPIO 管脚,连接到开发板上任何一组 IIC 接口的对应管脚都可以。
标准的 I2C 需要两根信号线:
- SCL(Serial Clock):时钟线,时钟都是有 master 提供的
- SDA(Serial Data):双向数据线,发数据或者收数据(收发不能同时)
简单来说,只需要 2 根线,就可以对多台设备传输大量数据,减少单片机上 IO 口的占用。
硬件电路设计
物料清单(BOM 表):
| 材料名称 | 数量 |
|---|---|
| 带有 IIC 模块的 LCD1602 液晶屏 | 1 |
| 杜邦线(跳线) | 若干 |
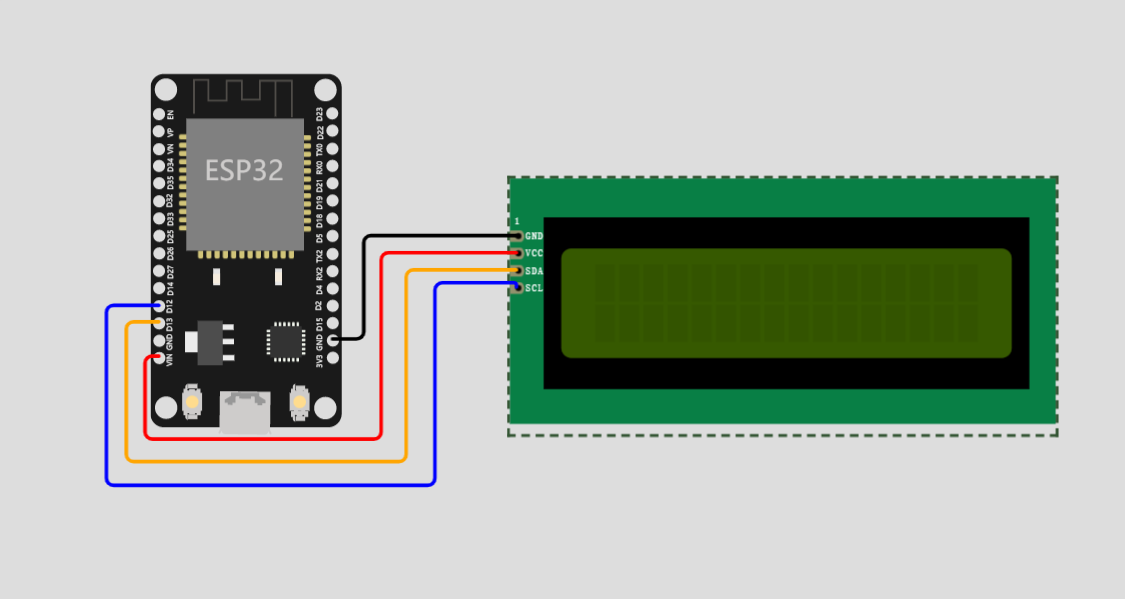
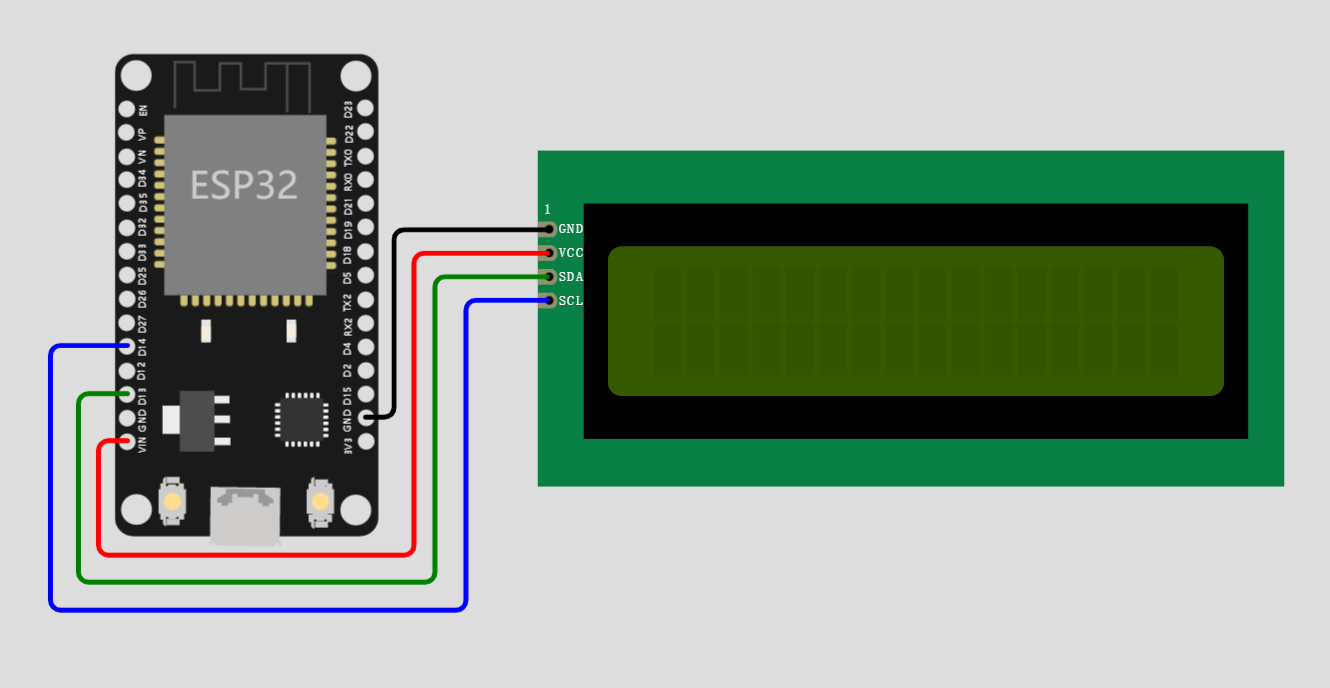
将材料按照下图相连:
注意
注意需要使用开发板上的 5V 电压,而不是 3.3V。真实环境下使用 3.3V 会无法显示或者显示很暗。
我们先把开发板与 LCD1602 相连,然后上电,但是,我们会看到 Shell 环境会显示我们的设备在无限重启。
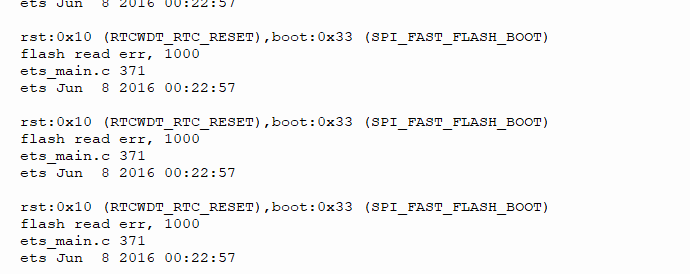
这是因为,我们用到了 ESP32 的 strapping 引脚(和芯片复位状态有关的引脚),strapping 引脚包括:
- GPIO 0
- GPIO 2
- GPIO 4
- GPIO 5 (启动时必须为高电平)
- GPIO 12 (启动时必须为低电平)
- GPIO 15 (启动时必须为高电平)
在硬件上要注意使用外接模块时不能将 GPIO12 拉高,否则将导致 ESP32 启动异常,而 I2C 总线空闲时两条线都是高电平。
此外,还有具有特定功能的管脚,使它们适合或不适合特定项目。下表显示了哪些管脚最适合用作输入和输出,哪些管脚需要小心。绿色突出显示的管脚可以使用。黄色突出显示的可以使用,但需要注意,因为它们可能在启动时有意外行为。不建议将红色突出显示的管脚用作输入或输出。
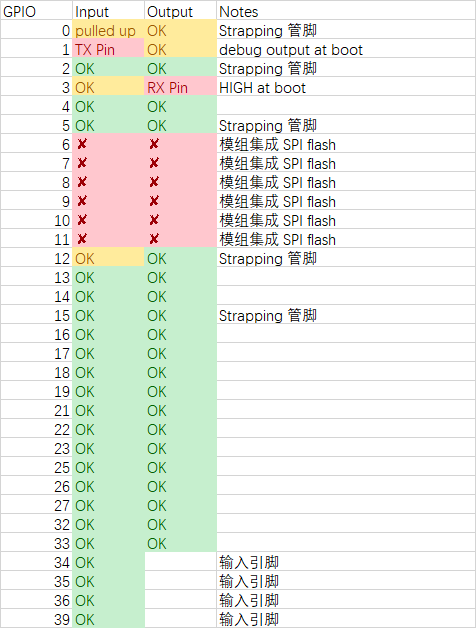
所以,我们把 Pin12 改为 Pin14,单片机上电就不会再重置了。
软件程序设计
SoftI2C 与 I2C 区别
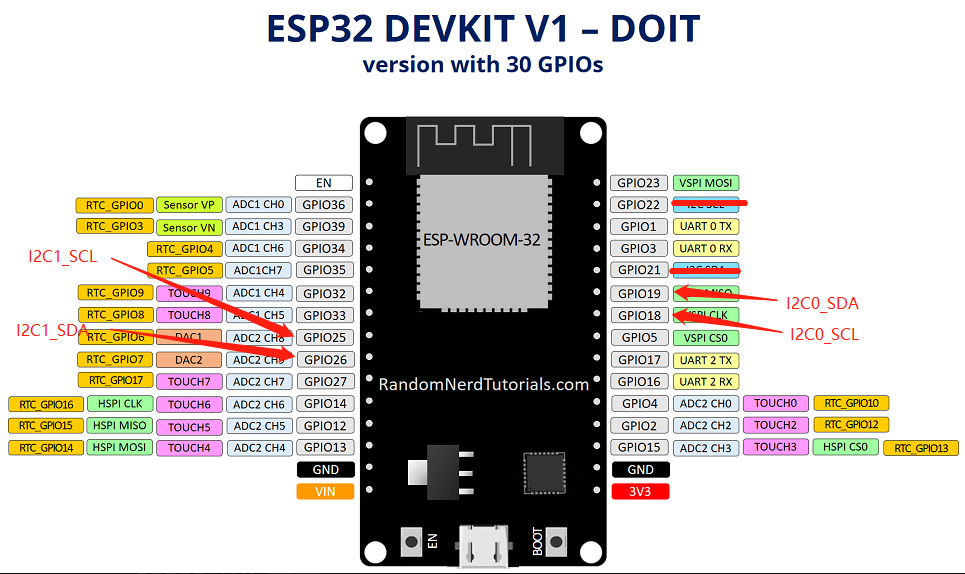
下图标注的就是我们常常所说的 I2C 引脚接口,这里的接口指的就是硬件 I2C 接口,我们在软件中仅用 I2C 表示即可。
特点:
- I2C(硬件 I2C)是由相应的 I2C 驱动电路,其使用的 I2C 管脚也是专用的。SoftI2C 其接口比较灵活,不受管脚限制;
- SoftI2C(软件 I2C)一般是由电路中常见的 GPIO 管脚所组成,使用软件来控制管脚状态用以模仿 I2C(硬件 I2C)进行通信;
- I2C(硬件 I2C)效率远高于 SoftI2C。
SoftI2C 适用于所有支持输出的引脚,并通过 machine.SoftI2C 类访问:
构造函数 machine.SoftI2C(scl, sda, freq=400000, timeout=255): 构造一个新的 SoftI2C 对象。
scl应该是一个 pin 对象,指定用于 SCL 的 pin。sda应该是一个 pin 对象,指定用于 SDA 的 pin。freq应该是一个整数,用于设置 SCL 的最大频率。timeout是等待时钟延长(SCL 被总线上的另一个设备保持为低电平)的最长时间(以微秒为单位),之后会引发OSError(ETIMEDOUT) 异常。
构造函数 machine.I2C(id, scl, sda, freq=400000, timeout=255): 构造一个新的硬件 I2C 对象。
id是 0、1,表示默认的 I2C 引脚,0 表示 scl=Pin(18), sad=Pin(19); 1 表示 scl=Pin(25), sad=Pin(26),注意:不能与 scl、sda 共用;scl应该是一个 pin 对象,指定用于 SCL 的 pin。sda应该是一个 pin 对象,指定用于 SDA 的 pin。freq应该是一个整数,用于设置 SCL 的最大频率。timeout是等待时钟延长(SCL 被总线上的另一个设备保持为低电平)的最长时间(以微秒为单位),之后会引发OSError(ETIMEDOUT) 异常。
使用方法如下:
from machine import Pin, I2C

i2c = SoftI2C(scl=Pin(12), sda=Pin(13), freq=100000)

# 扫描设备,I2C 协议
i2c.scan()

# read 4 bytes from device with address 0x3a
i2c.readfrom(0x27, 4)
# write '12' to device with address 0x3a
i2c.writeto(0x27, '12')

# create a buffer with 10 bytes
buf = bytearray(10)
# write the given buffer to the peripheral
i2c.writeto(0x27, buf)
打印 Hello world
我们之前在做数码管实验和舵机实验的时候是不是都用过驱动代码,LCD1602 和舵机一样,都是很常用的模块,因此,在开源社区中也有相关的代码,我们可以自己找到下载下来,或者,把我们网站上准备好的的代码复制到 MicroPython 设备中,这个属于第三方代码对不对,所以我们把它放到 libs 目录下。
把下面代码放到 libs 目录下的 lcd_api.py 中,
'''libs/lcd_api.py'''
import time


class LcdApi:
    # Implements the API for talking with HD44780 compatible character LCDs.
    # This class only knows what commands to send to the LCD, and not how to get
    # them to the LCD.
    #
    # It is expected that a derived class will implement the hal_xxx functions.
    #
    # The following constant names were lifted from the avrlib lcd.h header file,
    # with bit numbers changed to bit masks.

    # HD44780 LCD controller command set
    LCD_CLR = 0x01  # DB0: clear display
    LCD_HOME = 0x02  # DB1: return to home position

    LCD_ENTRY_MODE = 0x04  # DB2: set entry mode
    LCD_ENTRY_INC = 0x02  # DB1: increment
    LCD_ENTRY_SHIFT = 0x01  # DB0: shift

    LCD_ON_CTRL = 0x08  # DB3: turn lcd/cursor on
    LCD_ON_DISPLAY = 0x04  # DB2: turn display on
    LCD_ON_CURSOR = 0x02  # DB1: turn cursor on
    LCD_ON_BLINK = 0x01  # DB0: blinking cursor

    LCD_MOVE = 0x10  # DB4: move cursor/display
    LCD_MOVE_DISP = 0x08  # DB3: move display (0-> move cursor)
    LCD_MOVE_RIGHT = 0x04  # DB2: move right (0-> left)

    LCD_FUNCTION = 0x20  # DB5: function set
    LCD_FUNCTION_8BIT = 0x10  # DB4: set 8BIT mode (0->4BIT mode)
    LCD_FUNCTION_2LINES = 0x08  # DB3: two lines (0->one line)
    LCD_FUNCTION_10DOTS = 0x04  # DB2: 5x10 font (0->5x7 font)
    LCD_FUNCTION_RESET = 0x30  # See "Initializing by Instruction" section

    LCD_CGRAM = 0x40  # DB6: set CG RAM address
    LCD_DDRAM = 0x80  # DB7: set DD RAM address

    LCD_RS_CMD = 0
    LCD_RS_DATA = 1

    LCD_RW_WRITE = 0
    LCD_RW_READ = 1

    def __init__(self, num_lines, num_columns):
        self.num_lines = num_lines
        if self.num_lines > 4:
            self.num_lines = 4
        self.num_columns = num_columns
        if self.num_columns > 40:
            self.num_columns = 40
        self.cursor_x = 0
        self.cursor_y = 0
        self.implied_newline = False
        self.backlight = True
        self.display_off()
        self.backlight_on()
        self.clear()
        self.hal_write_command(self.LCD_ENTRY_MODE | self.LCD_ENTRY_INC)
        self.hide_cursor()
        self.display_on()

    def clear(self):
        # Clears the LCD display and moves the cursor to the top left corner
        self.hal_write_command(self.LCD_CLR)
        self.hal_write_command(self.LCD_HOME)
        self.cursor_x = 0
        self.cursor_y = 0

    def show_cursor(self):
        # Causes the cursor to be made visible
        self.hal_write_command(self.LCD_ON_CTRL | self.LCD_ON_DISPLAY |
                               self.LCD_ON_CURSOR)

    def hide_cursor(self):
        # Causes the cursor to be hidden
        self.hal_write_command(self.LCD_ON_CTRL | self.LCD_ON_DISPLAY)

    def blink_cursor_on(self):
        # Turns on the cursor, and makes it blink
        self.hal_write_command(self.LCD_ON_CTRL | self.LCD_ON_DISPLAY |
                               self.LCD_ON_CURSOR | self.LCD_ON_BLINK)

    def blink_cursor_off(self):
        # Turns on the cursor, and makes it no blink (i.e. be solid)
        self.hal_write_command(self.LCD_ON_CTRL | self.LCD_ON_DISPLAY |
                               self.LCD_ON_CURSOR)

    def display_on(self):
        # Turns on (i.e. unblanks) the LCD
        self.hal_write_command(self.LCD_ON_CTRL | self.LCD_ON_DISPLAY)

    def display_off(self):
        # Turns off (i.e. blanks) the LCD
        self.hal_write_command(self.LCD_ON_CTRL)

    def backlight_on(self):
        # Turns the backlight on.

        # This isn't really an LCD command, but some modules have backlight
        # controls, so this allows the hal to pass through the command.
        self.backlight = True
        self.hal_backlight_on()

    def backlight_off(self):
        # Turns the backlight off.

        # This isn't really an LCD command, but some modules have backlight
        # controls, so this allows the hal to pass through the command.
        self.backlight = False
        self.hal_backlight_off()

    def move_to(self, cursor_x, cursor_y):
        # Moves the cursor position to the indicated position. The cursor
        # position is zero based (i.e. cursor_x == 0 indicates first column).
        self.cursor_x = cursor_x
        self.cursor_y = cursor_y
        addr = cursor_x & 0x3f
        if cursor_y & 1:
            addr += 0x40  # Lines 1 & 3 add 0x40
        if cursor_y & 2:  # Lines 2 & 3 add number of columns
            addr += self.num_columns
        self.hal_write_command(self.LCD_DDRAM | addr)

    def putchar(self, char):
        # Writes the indicated character to the LCD at the current cursor
        # position, and advances the cursor by one position.
        if char == '\n':
            if self.implied_newline:
                # self.implied_newline means we advanced due to a wraparound,
                # so if we get a newline right after that we ignore it.
                pass
            else:
                self.cursor_x = self.num_columns
        else:
            self.hal_write_data(ord(char))
            self.cursor_x += 1
        if self.cursor_x >= self.num_columns:
            self.cursor_x = 0
            self.cursor_y += 1
            self.implied_newline = (char != '\n')
        if self.cursor_y >= self.num_lines:
            self.cursor_y = 0
        self.move_to(self.cursor_x, self.cursor_y)

    def putstr(self, string):
        # Write the indicated string to the LCD at the current cursor
        # position and advances the cursor position appropriately.
        for char in string:
            self.putchar(char)

    def custom_char(self, location, charmap):
        # Write a character to one of the 8 CGRAM locations, available
        # as chr(0) through chr(7).
        location &= 0x7
        self.hal_write_command(self.LCD_CGRAM | (location << 3))
        self.hal_sleep_us(40)
        for i in range(8):
            self.hal_write_data(charmap[i])
            self.hal_sleep_us(40)
        self.move_to(self.cursor_x, self.cursor_y)

    def hal_backlight_on(self):
        # Allows the hal layer to turn the backlight on.
        # If desired, a derived HAL class will implement this function.
        pass

    def hal_backlight_off(self):
        # Allows the hal layer to turn the backlight off.
        # If desired, a derived HAL class will implement this function.
        pass

    def hal_write_command(self, cmd):
        # Write a command to the LCD.
        # It is expected that a derived HAL class will implement this function.
        raise NotImplementedError

    def hal_write_data(self, data):
        # Write data to the LCD.
        # It is expected that a derived HAL class will implement this function.
        raise NotImplementedError

    def hal_sleep_us(self, usecs):
        # Sleep for some time (given in microseconds)
        time.sleep_us(usecs)
把下面代码放到 libs 目录下的 i2c_lcd.py 中,
'''libs/i2c_lcd.py'''
import utime

from libs.lcd_api import LcdApi
from machine import I2C

# PCF8574 pin definitions
MASK_RS = 0x01  # P0
MASK_RW = 0x02  # P1
MASK_E = 0x04  # P2

SHIFT_BACKLIGHT = 3  # P3
SHIFT_DATA = 4  # P4-P7


class I2cLcd(LcdApi):

    # Implements a HD44780 character LCD connected via PCF8574 on I2C

    def __init__(self, i2c, i2c_addr, num_lines, num_columns):
        self.i2c = i2c
        self.i2c_addr = i2c_addr
        self.i2c.writeto(self.i2c_addr, bytes([0]))
        utime.sleep_ms(20)  # Allow LCD time to powerup
        # Send reset 3 times
        self.hal_write_init_nibble(self.LCD_FUNCTION_RESET)
        utime.sleep_ms(5)  # Need to delay at least 4.1 msec
        self.hal_write_init_nibble(self.LCD_FUNCTION_RESET)
        utime.sleep_ms(1)
        self.hal_write_init_nibble(self.LCD_FUNCTION_RESET)
        utime.sleep_ms(1)
        # Put LCD into 4-bit mode
        self.hal_write_init_nibble(self.LCD_FUNCTION)
        utime.sleep_ms(1)
        LcdApi.__init__(self, num_lines, num_columns)
        cmd = self.LCD_FUNCTION
        if num_lines > 1:
            cmd |= self.LCD_FUNCTION_2LINES
        self.hal_write_command(cmd)

    def hal_write_init_nibble(self, nibble):
        # Writes an initialization nibble to the LCD.
        # This particular function is only used during initialization.
        byte = ((nibble >> 4) & 0x0f) << SHIFT_DATA
        self.i2c.writeto(self.i2c_addr, bytes([byte | MASK_E]))
        self.i2c.writeto(self.i2c_addr, bytes([byte]))

    def hal_backlight_on(self):
        # Allows the hal layer to turn the backlight on
        self.i2c.writeto(self.i2c_addr, bytes([1 << SHIFT_BACKLIGHT]))

    def hal_backlight_off(self):
        # Allows the hal layer to turn the backlight off
        self.i2c.writeto(self.i2c_addr, bytes([0]))

    def hal_write_command(self, cmd):
        # Write a command to the LCD. Data is latched on the falling edge of E.
        byte = ((self.backlight << SHIFT_BACKLIGHT) |
                (((cmd >> 4) & 0x0f) << SHIFT_DATA))
        self.i2c.writeto(self.i2c_addr, bytes([byte | MASK_E]))
        self.i2c.writeto(self.i2c_addr, bytes([byte]))
        byte = ((self.backlight << SHIFT_BACKLIGHT) |
                ((cmd & 0x0f) << SHIFT_DATA))
        self.i2c.writeto(self.i2c_addr, bytes([byte | MASK_E]))
        self.i2c.writeto(self.i2c_addr, bytes([byte]))
        if cmd <= 3:
            # The home and clear commands require a worst case delay of 4.1 msec
            utime.sleep_ms(5)

    def hal_write_data(self, data):
        # Write data to the LCD. Data is latched on the falling edge of E.
        byte = (MASK_RS |
                (self.backlight << SHIFT_BACKLIGHT) |
                (((data >> 4) & 0x0f) << SHIFT_DATA))
        self.i2c.writeto(self.i2c_addr, bytes([byte | MASK_E]))
        self.i2c.writeto(self.i2c_addr, bytes([byte]))
        byte = (MASK_RS |
                (self.backlight << SHIFT_BACKLIGHT) |
                ((data & 0x0f) << SHIFT_DATA))
        self.i2c.writeto(self.i2c_addr, bytes([byte | MASK_E]))
        self.i2c.writeto(self.i2c_addr, bytes([byte]))
第三方模块导入完成后,我们就可以写主程序了。
我们知道硬件 I2C 和软件 I2C 的区别在于,软件 I2C 是通过软件编程使 CPU 拉高拉低 SDA 和 SCL 引脚,模拟出 I2C 总线的;而硬件 I2C 则是使用 ESP32 内部的 I2C 硬件驱动器实现总线的读写。
很明显的,硬件 I2C 比软件 I2C 更加节约 CPU 资源,因为 CPU 不用去频繁操作 SDA 和 SCL 引脚了。如果你操作屏幕频繁,硬件 I2C 将是你最佳的选择。
如果我们使用硬件 I2C 的话,在 shell 中会跳出提示 Warning: I2C(-1, ...) is deprecated, use SoftI2C(...) instead,意思不建议你使用 I2C,建议你使用 SoftI2C,所以我们的代码还是使用软件 I2C 总线吧。
from machine import Pin, SoftI2C, I2C
from libs.i2c_lcd import I2cLcd

# 定义 SoftI2C 控制对象
i2c = SoftI2C(sda=Pin(13), scl=Pin(14), freq=100000)

# 获取 I2C 从机地址
address = i2c.scan()[0]

# 定义 I2CLCD 对象
i2c_lcd = I2cLcd(i2c, address, 2, 16)

# 显示 Hello world
i2c_lcd.putstr('Hello, world!')